How to Reupholster an Arm Chair
Reupholstering a chair is a rewarding DIY project that can breathe new life into your furniture. Whether you’re updating a beloved heirloom or giving a flea market find a fresh look, here’s a step-by-step guide to help you reupholster a chair:
Remove Old Fabric.
Photograph the Chair: Take full-length and detailed photos of the chair before you start. These serve as references, in detail. Disassemble the Chair: Carefully remove the upholstery pieces, so that you preserve them as patterns for the new fabric. Mark Each Piece: Label each piece, in addition (outside back, right side back, left side back, inside back, seat, and seat sides) and note the direction (top/front). Save Welting and Tack Strips: Keep pieces of welting and tack strips to measure for new ones.
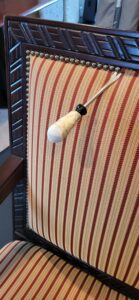 Replace Batting. For the most part, If the old batting is worn or stained, remove it from the chair back and seat and replace it later. Check springs and webbing for damage and repair if necessary. Sand, prime, and paint the frame or legs if desired. Cut a piece of 1/2-inch-thick batting to cover the chair back and seat (if needed). Staple the batting down, pulling gently to prevent visible indents from the staples.
Prep & Cut New Fabric. The first thing to remember is to measure all the pieces and cord lengths using the old upholstery as a guide. Cut the new upholstery fabric according to the patterns you saved. Err on the side of too much fabric to avoid coming up short. This is a MUST!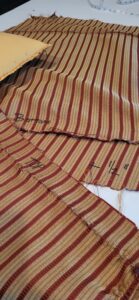
Attach New Fabric. Start with the chair back, stapling the fabric down. Pull the fabric firmly and evenly. Repeat the process for the seat and other pieces.
Cover the Front Facing Arms. If your chair has arms, cover them with the new fabric. Pay attention to details like welting and seams.
Reattach Seats. Reattach the seat pieces to the chair frame (in the same manner as you found them). Use a staple gun or upholstery tacks to secure the fabric. Trim any excess fabric neatly.
Finish the Underside. Cover the underside of the chair with black breathable fabric, due to dust collection. Staple it neatly to conceal the staples and raw edges.
Remember, patience and attention to detail are key. With some basic tools, fabric, and creativity, you can transform an old chair into a stylish piece that reflects your personal taste! 🪑✨
For more detailed instructions and visual guidance, check out this step-by-step guide from Better Homes & Gardens. It’s equally important to check other references. Happy reupholstering! 🛋️🔨
When REUPHOLSTERING a chair, you’ll need a few essential tools and materials to achieve a successful transformation. As an illustration, here’s a list of what you’ll need and why you need them:
- Equipment / Tools:
- Needle-nose pliers: Useful for removing staples and tacks.
- Camera or notepaper and pencil: To document the chair before disassembly.
- Marking pen: For labeling upholstery pieces.
- Scissors: For cutting fabric and batting.
- Staple gun: Essential for attaching the new fabric.
- Straight pins: Helpful for securing fabric before stapling.
- Sewing machine: If you plan to sew any seams or trim pieces.
- Staple/Nail removal tool: For prying up old fasteners and helping the job go quicker.
- Flathead screwdriver: For disassembling the chair.
- Hot glue gun: To attach decorative trim.
- Materials:
- Staples (1/4- or 3/8-inch): Used to secure fabric.
- Batting (1/2 inch): Provides cushioning and smoothness for a professional look.
- Upholstery fabric: Choose a durable, attractive fabric.
- Chalk: For marking fabric.
- Polyester Welt Cord: Optional, for decorative piping.
- Cellulose Piping/Gimp: Another option for purchased decorative trim.
- Upholstery-weight thread: If sewing is required.
- Tack strips: Used to secure fabric edges.
- Cardboard strips: To eliminate puckering of stapled areas.
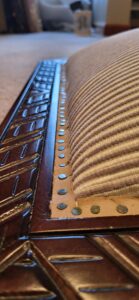
- Hot glue: To apply trim fabric or cord more quickly.
- Upholstery tacks or nail head trim (optional): Adds decorative detail.
- Black breathable fabric for the underside of the chair: Conceals staples and raw edges.
Above all, as a result of having the right tools and materials will make your reupholstering project smoother and more enjoyable! Happy crafting! 🛋️🔨
How long will this project take? As I note in the video, this project is simple.
Reupholstering a dining chair with a removable seat cushion is one of the simplest DIY tasks for beginners. It takes approximately one to 2 hours to complete a chair. If the chair’s frame (legs and supports) is in good shape, you can easily change its look with little effort. This project involves using a staple gun and new fabric to customize the cushions. It’s a cost-effective way to redecorate your home or add a fresh pop of color to any room. One yard of fabric typically covers two standard dining chairs1.
Larger chairs, such as fully upholstered accent chairs or recliners, require more time due to their intricate designs and additional fabric. The process involves disassembling the chair, removing old fabric, making any necessary repairs, as well as attaching new upholstery. While it’s more time-consuming, the results can be well worth the effort2. This takes several hours, as I have shown.
If you’re reupholstering just the seat cushions of dining chairs, it’s a straightforward project that can be accomplished relatively quickly. Perfect for beginners, this task involves removing the seat, replacing the fabric, and securing it with a staple gun3.
For chairs with more complex designs, such as fully reupholstered armchairs or antique pieces, the process can take longer. These projects may involve intricate details, multiple layers of fabric, and additional steps like sewing and attaching welt cord. However, the transformation can breathe new life into outdated furniture4. This takes one day or more, at least.
When it comes to upholstery fabric, you have a variety of options to choose from.
At this time, let’s explore the different types:
In the first place, natural fabrics have certain benefits. Cotton, for example, Resists wear, fading, and pilling. However, it’s vulnerable to dirt and wrinkling. Wool is durable, flame-resistant, and naturally stain-resistant. Silk is luxurious but delicate; best for low-traffic areas. Leather is timeless and durable, suitable for both classic and modern styles. Linen is breathable, lightweight, and elegant. Hemp is strong, eco-friendly, and resistant to mold and mildew
Even more, Synthetic Fabrics, such as Polyester are durable, easy to clean, and resistant to fading. Polypropylene is stain-resistant and suitable for high-traffic areas. Acrylic mimics wool but is more affordable. Nylon is strong, abrasion-resistant, and easy to maintain. Rayon is soft and versatile, often blended with other fibers. Acetate resembles silk but is less durable.
When it comes to blends, many fabrics combine natural and synthetic fibers to enhance durability, texture, and performance. Some Considerations are durability. Choose fabrics based on the chair’s usage (high-traffic vs. decorative). Cleanability is also important. Some fabrics are easier to clean than others. Color and Pattern, for instance, are a Consideration for your decor style and personal preferences. Fire Retardancy is key if you need upholstery fabrics to be treated to be fire-resistant. Lastly, prices vary based on fabric type and quality.
In summary, remember that each fabric type has its own unique characteristics, so consider your specific needs and preferences when selecting upholstery fabric.

